Sound sensor data on Arduino IDE serial plotter
CZN-15E sound sensor
CZN-15E sound sensor
The CZN-15E sound sensor can measure whether sound is present. This makes it possible, for example, to make a clap sensor. Unlike a microphone, it does not measure the frequency or volume of the sound. It is a binary sensor that only indicates whether sound is detected.
Sound sensor operation
In the upper part of the figure you can see sound waves reaching the sensor. The microphone converts this to a resistance. This resistance changes as the sound is louder or softer. The sensor then determines whether the resistance is above a certain threshold. Once this is the case the OUT pin on the sensor will change from LOW to HIGH.
sensitivity control
The sensitivity of the sensor is adjustable. On top of the sensor is a blue square block. With a small screwdriver you can turn the center to the left or right. This sets the correct sensitivity.
The circuit
Connect the sensor according to the diagram below.
The CZN-15E sound sensor connected to the Arduino
We use the following jumper wires
The
5Von the Arduino -> VCC pin of the sensorThe
GNDon the Arduino -> GND pin of the sensorPin 8on the Arduino -> OUT pin of the sensor
Arduino Code - part 1
The code below reads the OUT_PIN (pin 8) and then sends the measured value to the serial monitor.
1 const int OUT_PIN = 8;
2
3 void setup() {
4   Serial.begin(9600);
5 }
6
7 void loop() {
8   Serial.println(digitalRead(OUT_PIN));
9 }
Upload this code to your Arduino and open the serial monitor in the Arduino IDE:
Tools ▸ Serial Monitor
You should see 1 and 0 passing by when you make a sound. Here 0 is for silence and 1 for when there is sound.
serial monitor
Serial plotter
In addition to the serial monitor, the Arduino has another handy tool: the serial plotter. With this tool you can display data in real time over time. This can be used for example for temperature graphs.
You can access the serial plotter from the menu at the top of the IDE:
Tools ▸ Serial Plotter
The ones and zeros of the serial monitor should now be displayed in a graph.
serial plotter
Data sampling
For part 2 of this tutorial we will use data sampling. This means that we will measure a certain value at a fixed interval (sample time), for example 10ms. For example, you can count how often a certain value has occurred within the sample time. Then display the result of this count in a graph.
Arduino Code - part 2
We start by defining two constants and four variables:
1 const int OUT_PIN = 8;
2 const int SAMPLE_TIME = 10;
3 unsigned long millisCurrent;
4 unsigned long millisLast = 0;
5 unsigned long millisElapsed = 0;
6 int sampleBufferValue = 0;
OUT_PINis the pin to which we connected the sensor.SAMPLE_TIMEis the number of milliseconds in which we measure the data for one sample.We use
millisCurrent,millisLastandmillisElapsedto keep track of how much time has passed.We use
sampleBufferValueto store how many times there has been sound within the sample time.
setup()
1 void setup()
2 {
3   Serial.begin(9600);
4 }
In the setup() we do nothing but set the serial monitor to 9600 Baud.
loop()
1 void loop() {
2
3   millisCurrent = millis();
4   millisElapsed = millisCurrent - millisLast;
5
6   if (digitalRead(OUT_PIN) == LOW) {
7     sampleBufferValue++;
8   }
9
10   if (millisElapsed > SAMPLE_TIME) {
11     Serial.println(sampleBufferValue);
12     sampleBufferValue = 0;
13     millisLast = millisCurrent;
14   }
15
16 }
The loop() function consists of 3 parts:
Calculate elapsed time
Read sensor
Check if the sample time has elapsed
millis()
When calculating the elapsed time, we use the mills() function. This returns the number of milliseconds elapsed since the Arduino was booted. The returned number is of type unsigned long. After about 50 days the highest number is reached, the Arduino will then start counting again from 0.
1 millisCurrent = millis();
2 millisElapsed = millisCurrent - millisLast;
First we store the number of elapsed milliseconds in the variable millisCurrent. Then we can calculate how much time has passed since the last time by subtracting millisLast. We store this in the variable millisElapsed. The first time millisLast is still at 0, so millisElapsed is equal to millisCurrent.
Reading the sensor
We use digitalRead() to read the sensor.
1 if (digitalRead(OUT_PIN) == LOW) {
2   sampleBufferValue++;
3 }
If the value read is equal to LOW we increment sampleBufferValue by 1. The abbreviated notation for this is sampleBufferValue++.
🎓 Can you indicate why we are checking here if the sensor is LOW?
Monitor Elapsed Sample Time
We don't yet have a way to determine if the sample time has expired. We'll do that in the last part of the code.
1 if (millisElapsed > SAMPLE_TIME) {
2   Serial.println(sampleBufferValue);
3   sampleBufferValue = 0;
4   millisLast = millisCurrent;
5 }
The moment the elapsed time (millisElapsed) is greater than the time that a sample is allowed to last, we will do a number of things. First we print the value of the buffer (sampleBufferValue) to the serial monitor. sampleBufferValue contains how many times the sensor in the current sample has sensed sound.
After this we start a new sample measurement. We set the sampleBufferValue (ie how often sound was detected) back to 0. Finally, we make millisLast equal to millisCurrent so that we can recalculate the elapsed time of the current sample.
Upload code to Arduino
You can now upload the code to the Arduino.
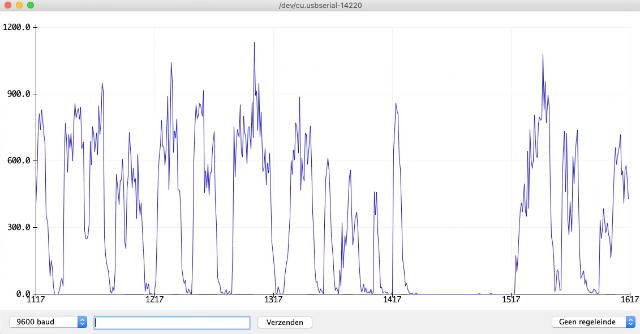
serial plotter with sampled data
Open the serial plotter to display the sampled values from the sensor.
Tools ▸ Serial plotter
The X and Y axis
The x-axis (horizontal) is the time axis. We set SAMPLE_TIME to 10ms. This means that each horizontal point is equal to 10ms. So if we see the number 100 on the x-axis (100x 10ms), 1 second has passed.
The y-axis (vertical) is the number of moments within 10ms that the Arduino sensed sound. This is related to how fast the Arduino can go through the loop(). For example, an 8Mhz Arduino will be able to do fewer measurements per second than a 16Mhz Arduino. They are therefore not exact values, but should be viewed more relative to each other.
